Pad Making Instructions – Fold Up Pads – A “Fold Up” pad is one that is all in one piece, but must be folded for use. Depending on the way the pad is made, the fold up part can be the top, with the winged part as the base. Or it could be that the fold up part is worn facing down, with the winged part at the top. The foldable nature of the pad allows for faster drying and cleaning. I suggest making the foldup part on the bottom and including a strip of PUL, ripstop nylon or other waterproofing.

Advantages of Fold Up Pads
They are similar to an AIO pad, in that they don’t need any separate inserts that could get lost, and are fairly easy to use. They are faster drying than an AIO pad, as the fold-up part can flap freely to dry while hanging. They also use less waterproofing material than a regular AIO pad, as you can waterproof just the back strip. They can also be boosted if needed, by placing an absorbent booster/insert into the foldup section to add additional layers. poker 99
Instruction sheet
We also created an instruction sheet, giving information in picture form of how to wear and wash Fold-up pads. This is useful for areas where instructions given in English may not be understood. The instruction sheet can be downloaded below, in both a single .gif format, and also as .doc file, with 6 to an A4 page. sbobet365
There are 2 versions, one “plain”, the other has a greyed back of the foldup part, to try and represent that a waterproofed layer would be folded so that it is on the outside. www.americannamedaycalendar.com
Patterns
You can download basic pad pattern templates below. 2 sizes are provided. A set might include 2 longer and 3 shorter pads, to give the recipient different length pads should they find they need longer pads (while sitting in class or overnight etc.). These are provided as an image (.gif) with a size indication guide so you can check they print at the right scale. You can insert the image into a word processing document file and drag the image to resize it if you would like to make any alterations to the size or shape. These patterns do not include seam allowance.
Making a Fold Up Pad
First you take your winged pad shape…. cut 2 of flannel/flannelette, or if you want a heavy absorbency pad you can do one layer cotton terry and one layer flannel or cotton. Overlock/Serge/Zigzag or otherwise sew these layers together. So you basically just have a really thin pad
Then cut out a rectangle that is as long as the pad is, and 3 times wider than you want the crotch width to be when the pad is snapped. Eg the length of the smaller pad is 20cm and the crotch width is 7cm, the rectangle needs to be 20cm by 21cm. For a light absorbency pad cut 2 of flannel/flannelette, or for something heavier use 1 layer terry.
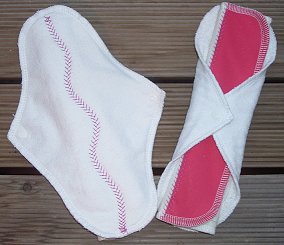
If you want PUL on the foldup part (as in this example), sew that on before you assemble the pad. That PUL strip should be the length of the fold up bit but a little less than 1/3 the width (eg in this example you’d want 6cm wide). Sew that down on the inside side (if that makes sense) – use a zigzag or other such stitch to cover the edge.

Then sew or overlock/serge around the edges of the foldup part to finish that off.

Then you fold the trifold section up and place that onto your winged piece, so it’s in the centre where you want it to be…. and then unfold it and pin it on (so you’re only pinning the winged part and the part of the trifold that will be sewn to it)

Flip the pad over, and you should have this

Now you have to sew down the centre to sew the 2 parts together. You can do this however you like… you can sew straight down the centre, or a wavy line, 2 parallel lines or a rectangle – it’s up to you. So opened out, you get something like this:
