Wetbag – A “wetbag” is the name for a pouch/bag that can be used to place used pads into. While the name may seem to mean it could hold water, the idea is simply that it is made from a fabric that will contain any odour and if the pads are wet with blood, there will be no leakage.
PUL, vinyl, plastic tablecloth material, or a thick polyester/nylon fabric (or double layer nylon) would be suitable. Even a PVC pencil case would be appropriate for a wetbag. poker asia
Ideally, a wetbag should be provided with any cloth pad donation kit. This allows the recipient to carry a clean pad in the bag with her to work/school, and provides somewhere to store the used pad, when pads are changed during the day. sbobet
If you are making pads to donate, this guide will show you how to make a very basic 2 compartment wetbag. This guide uses 1 large piece of PUL, but if you are working with smaller amounts, you could make it with a bottom seam and use smaller pieces. https://www.mrchensjackson.com/
Step #1
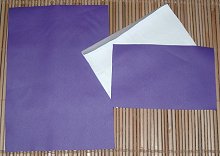
Take a piece of paper. What we’re going to be doing is making an envelope type shape as shown. So fold your paper (almost in half, but with a top flap). We will be needing one piece of fabric the whole piece of paper size, and one a little shorter than the folded size. This makes a reasonable size wetbag, you could reduce the size to even half as wide (which would conserve fabric)

Step #2
Cut out your pieces of waterproof fabric, So that you have your full piece of paper size. If you want to make a divider inside, so that both clean and used pads can be stored in the same bag, you will need one piece the same size as your folded envelope of paper.

Step #3
If you have an “overlocker” or “Serger”, finish the short edges of the large piece, and the long edges of the smaller piece. If you don’t have an overlocker/serger, you could “zigzag” it… or you’ll have to make this wetbag in a “turn and topstitch” method (which isn’t covered in this guide). Then sew some velcro on both short ends of the long piece as shown (make sure you have one piece on the right side of the fabric and one piece on the wrong side!). Hint – If you cut the corners off the velcro, it’s not sharp and pokey 🙂 You could use snaps instead.
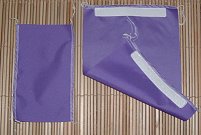
Step #4
Lay the short piece ontop of the longer piece, leaving a little space below the velcro. The bottm of the small piece should be along the fold line that you would fold the large piece up. If you would like the compartments of the wetbag to be completely separate, sew the bottom of the short piece down. If not, then leave it as is, and the small piece then becomes a divider, rather than a contained pocket.

Step #5
Fold the bottom part of the large piece of PUL up, so that it meets the top edge of the smaller piece. You should now see the form of the wetbag. You can pin this together to keep it straight.

Step #6 Now just overlock/serge down each side, sewing the layers together

or…
A quicker and easier version that doesn’t require velcro. You can fold the flap down and overlock/serge it straight down the sides – so you are sewing the flap down at the sides at the same time. Then you can place a snap (or velcro dot) in the centre to help keep it closed in the centre when it’s full (the snap is hard to see in this picture because the colour matches the PUL too well). This uses less velcro/snaps, and the flap stays closed at the edges due to being sewn down

Step #7
To finish off your threads, take a large needle, thread it through the stitches, and then poke the thread through the eye. Pull it through, and then cut off the excess

